If you’re far from home like me, you might be missing that classic New York City breakfast: the bagel. You probably have your favorite, either across, down, or uptown (and maybe even in that other place called Brook-something). It might be your local bagel shop or you might have that one that definitely requires a trip on the subway.
If Ess-a-Bagel isn’t on your list just stop reading now – you’re dead to me.
Anyway, the NYC bagel is where it’s at for breakfast…and sometimes lunch…and dinner.
My NYC Bagel Criteria:
- It is not a roll
- The outside skin is crispy and chewy at the same time
- The skin is dark and has tiny little crispy micro bubbles that seem to have burst in the oven
- Bagels are twisted – they are not made from a round piece of dough with a hole punched in the middle
- The interior has a nice, relatively airy crumb, but remains chewy and soft
- It has a hint of sourdough and malt, and is well salted
- Chewing a bagel requires a little jaw work
Ingredients and Sourcing
I’ve made Jim Lahey’s no-knead bread dozens of times with great success. I’ve always used whatever flour I had on hand, that being all-purpose flour. That recipe requires approximates for the ingredients because it is so simple and the hydration amount of about 80% leaves plenty of room for error.
Bagels, on the other hand, require some more structure to their creation than rustic bread. So, I set about buying recommended flour types and ingredients, including a kitchen scale. I will provide gram/cup equivalents, but one of the keys to these recipes is making sure that hydration level is correct – use a scale.
Then I riffed on the no-knead method and my bagels turned out 98% perfect. The typical bagel recipe includes a starter with flour, water, and yeast. I wanted it done in one go. I will explain the 2% in the “Next Time” section below.
I also highly recommend watching the videos in the Video References section at the bottom so you understand what is going on in the process.
I included links to where I purchased items, including Amazon.
- Scale
- Ozeri ZK24 Garden and Kitchen Scale. Cheap and highly rated from America’s Test Kitchen.
- High Gluten Flour
- I purchased 5lb of All Trumps High Gluten Flour from Baker’s Authority. I believe you can also use King Arthur Bread Flour, but I wanted to get something that bagel shops usually buy as a 50 lb bag. If you have a ton of all-purpose flour, you can get vital wheat gluten to add extra gluten.
- Water
- No, you don’t need NYC water to make great bagels, although the Ph of water can make a difference in how the dough ages, how the yeast works, etc. I used our well water and it turned out indistinguishable from the real thing.
- Yeast
- I used plain old Fleischmann’s Active Dry Yeast
- I would use active yeast over instant yeast
- Corn Meal
- Not critical, but useful in any baking to keep dough from sticking to something during proofing/baking. Highly recommended. Buy it anywhere.
- Salt
- Weighing and measuring salt can be vexing since the size of the granules make a huge difference when doing volume measurements. I used Morton’s Coarse Kosher Salt. Any salt will do, however, if you’re measuring by weight.
- Barley Malt Syrup
- I got a gallon of Barley Malt Syrup from Baker’s Authority since I was buying from them anyway, and they deliver quickly. You can by less quantity, but it seems the prices are about the same for less, so I just bought a gallon. You want diastatic malt syrup since it includes the enzymes you need for flavor and texture. For this recipe, the BMS was used in both the dough and the hot water bath.
- Diastatic Malt Powder
- I forgot to order this, but there are many bagel shops who prefer this to BMS in the dough. See linked videos down below. Baker’s Authority didn’t have in stock, but I ordered some from Amazon for the next round to see if it makes a difference.
- Temperature
- Our kitchen is in the mid 70s when I mixed the dough and let the yeast do it’s initial work. This is just a reference temperature. Lower/Higher temps can make a difference in rise, of course.
- Baking soda
- Arm & Hammer – the usual. If it has been sitting around for a year or two like in most kitchens, buy a new box.
- Kitchenaid Stand Mixer
- I said no-knead, but that’s not entirely true. I skipped a couple steps in the process, but kneading this dough is essential. Using part of the no-knead method makes using the Kitchenaid possible (it is a very stiff dough that is hard on non-professional machines).
- Pizza Stone or Baking Steel
- After years of using a pizza stone, I upgrade to a pizza steel and never looked back. Steel keeps it’s heat longer and gives a better rise to any baked goods, especially pizza, where it also crisps the bottom a lot better. The original steel I bought is not available – it has no lip on the sides and it just flat. Highly recommend the flat type if you can find it. I just leave mine at the bottom of the oven and then bring it to the middle when using it.
- Batch Size
- Finally, batch size. I elected to make enough dough for about 6-8 medium bagels. It could make about 10 smaller bagels. If you are using a scale, the recipe scales by doubling. If you’re doing by volume you might run into issues. If you double the recipe you will need to split the dough into two to knead it in the Kitchenaid.
Making the Bagels
Dough Ingredients
~ = approximately
- 420 grams high protein flour (~3 cups)
- 230 grams water (~1 cup) for 54% hydration.
- Some recipes call for 51% 214 grams, and as high as 60% (way too wet in my opinion)
- Some recipes call for ice water for dough mixing – I used room temp
- .5 tsp yeast (yep, no weight measurement here)
- 3 Tbsp (just over 1/8th cup) barley syrup (difficult to measure by volume or weight), approx. It is so sticky and messy!
- 8 grams salt = ~1.8% salt
Step 1 – Mixing the dough
- In a mixing cup, combine water add barley syrup – stir to dissolve
- Large bowl (Kitchenaid mixing bowl), combine flour, yeast and salt. Run the dough hook at low speed to mix it up.
- Add water mixture and run on low speed for approx 3 minutes to combine – sides should be clean. Run a little shorter/longer if the sides are clean and there’s no flour at the bottom.
- Cover with plastic wrap and sit in warm kitchen for 4-8 hours to rise/autolyse – check on it at 4 hours.
- My dough was nice and bubbly at 4 hours so I stopped there – kitchen temp was in the mid 70’s. You can go longer, but I would do at 30 minutes at a time – we’re not making bread.
- Put in mixer with dough hook for not more than 5 minutes on medium.
- Check consistency – dough should have come together in a single mass.
- A couple times during the 5 minutes the Kitchenaid
- Cover and place in fridge overnight. This was about 7 PM and I took it out at 10 AM the next morning.
Step 2 – Final Dough Preparation & Baking
- 1 Tblsp of Baking Soda
- ~1 cup of Barley Malt Syrup
- Large bowl of ice and water
- Corn meal
- Slotted spoon
- 2x Cookie sheets, one cooling rack
I figured out this sequence to save a little time and have things ready.
- Place baking stone/steel in the oven to 475 degrees for at least an hour before baking. If you have an electric oven, use Bake mode and not convection. Convection will dry out the crust too quickly.
- Take dough out of fridge and put in a warm spot for about 30-60 minutes
- Fill a large pot with water and set to boil (turn it down after it boils if you’re not ready to cook yet)
- I prepped two cookie sheets:
- On one I liberally sprinkled corn meal
- On the other I placed a cookie rack
- Place your large cutting board next the corn meal sheet
- When the dough is warmed up – It was cool, but not cold when I started, put back into Kitchenaid with dough hook and run medium speed for no more than 2.5 minutes.
- Place on lightly floured cutting board and cut a long strip from it
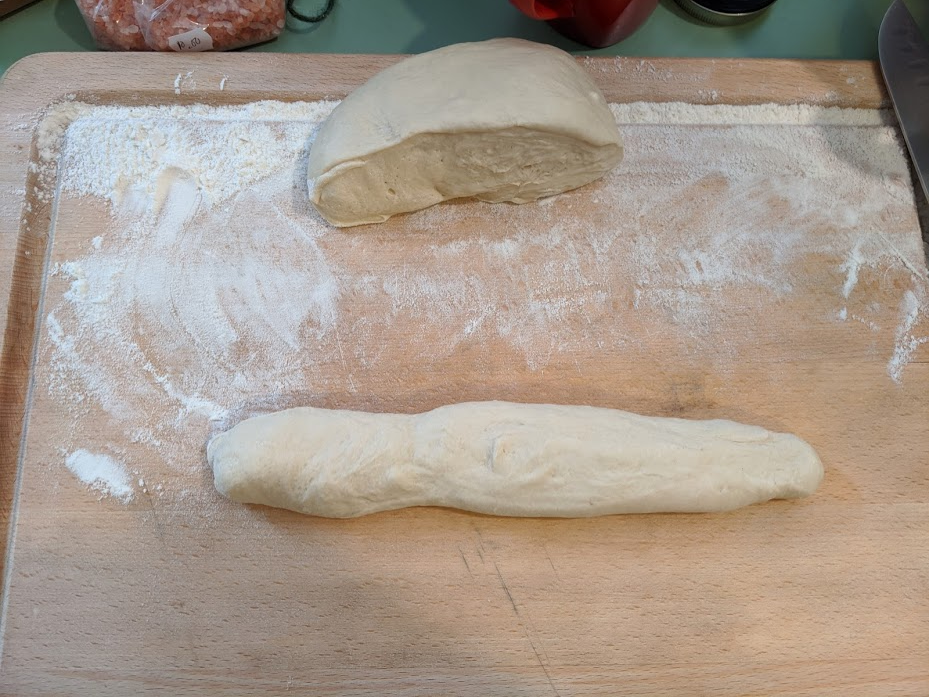
- Roll the dough out a bit and make sure that you twist the dough. Hold one side and then roll the other to put a twist in the dough.
- Watch this part of a video to see how to make the bagels https://youtu.be/hrJ1zpJGrfA?t=239
- Place them on the corn meal sheet. See the twist?
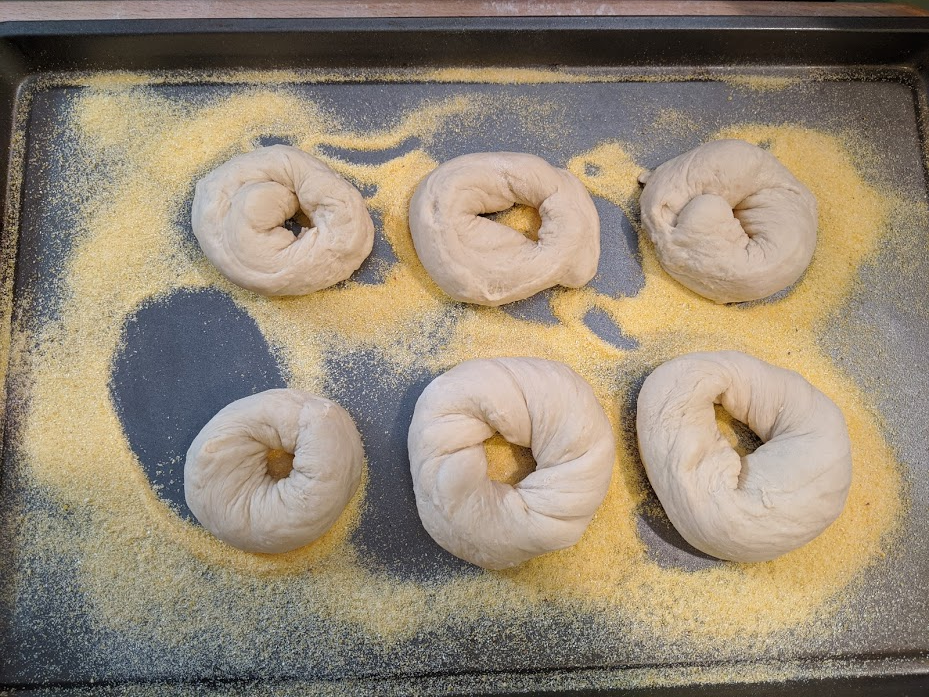
- I sprayed some plastic wrap with cooking oil, then covered the bagels for 30 minutes
- Bring the water back to a gentle boil and add Baking Soda & Barley Malt Syrup.
- Place the bagels corn meal side up in the boiling water for 30 seconds ( I did 3 at a time), flip them over for 30 seconds, and then place them in the ice water. After a minute I moved them to the cooling rack.

- I sprinkled some kosher salt on a couple of them, and poppy seed on one. The salt you can add to both sides. If you do both sides with other flavorings, the bottom might burn.
- The dough will be tender, so carefully add them to the oven. No need to flip them.
- Bake at 475 for 18-20 minutes
The Result
The kitchen smelled like bagels!
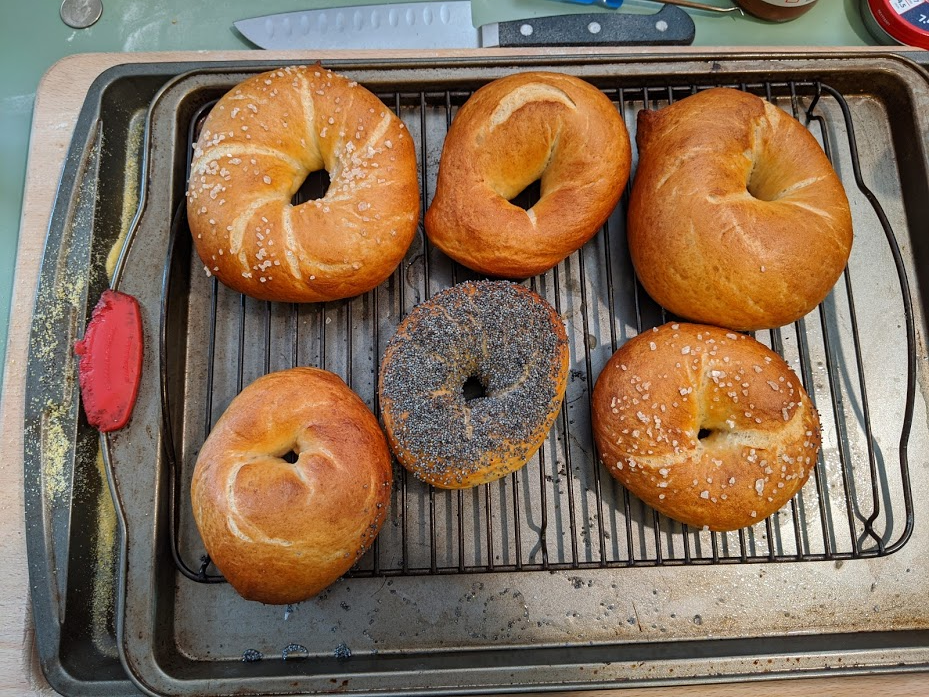
When they first came out my heart sank a little. I thought I had made bread rolls because of the splitting. Also missing were the crispy micro bubbles on the surface – I think that was the Convection setting drying them out too quickly.
I let them cool for 10-15 anxious minutes. This is an important step you should not skip – it sets the crust and the crumb. Trust me – they will still be warm.
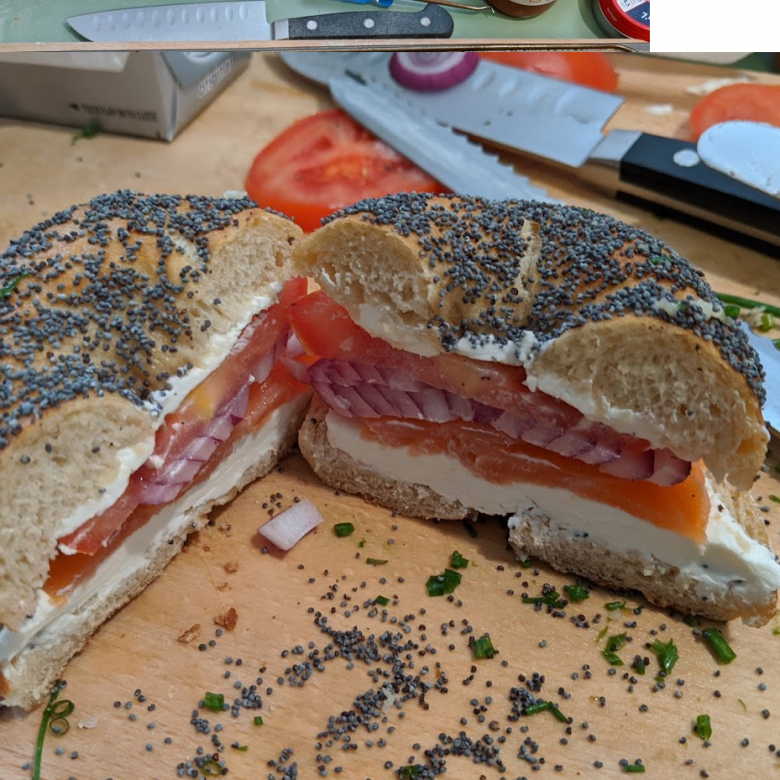
Then I cut one open and tried it. Crispy, crunchy skin, perfect crumb, yeasty/malty flavor. Chewy, but not sticky. Huzaaaaahhh!
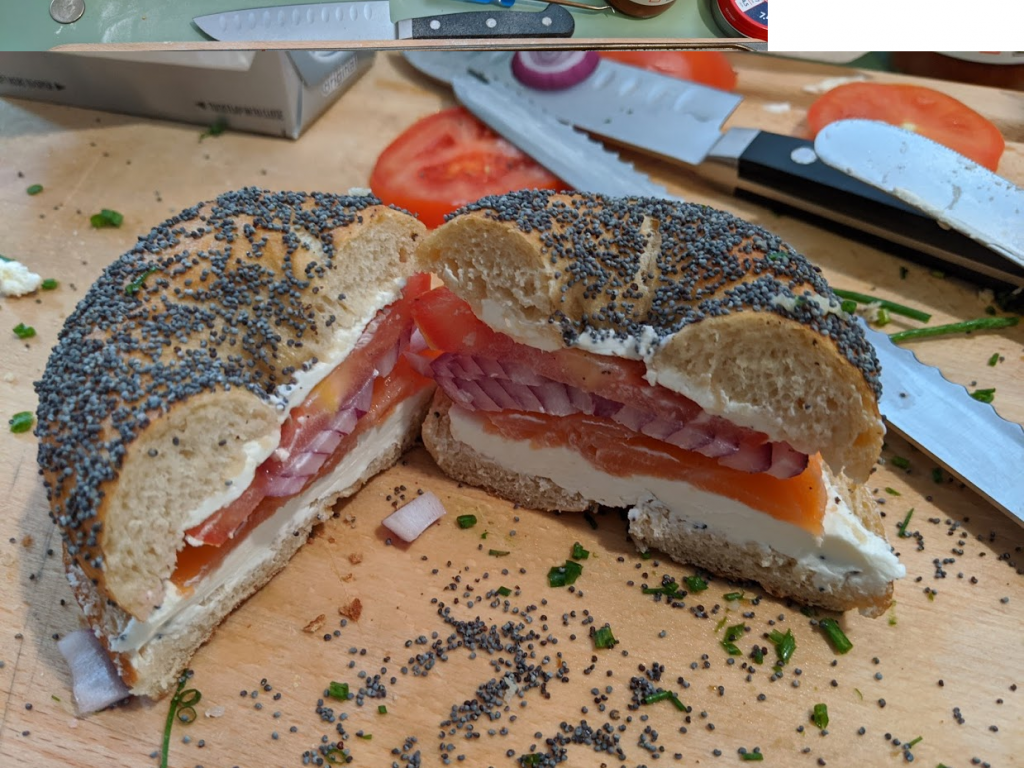
I added cream cheese, tomato, red onion, and lox (no capers, you savages).
Verdict
The last bagel I had was over 3 months ago. I was instantly transported back to New York City: the smells, the tastes, the textures. We devoured several of the bagels immediately with joyful noises and sighs interspersed.
What I Would Do Differently Next Time & Thoughts
Here’s a short list of what I will do differently next time, the remaining 2%, and some thoughts:
- Try diastatic malt powder in the dough instead of the malt syrup
- Make all the bagels about the same size as the poppy seed one (thus my counts for bagels in the recipe)
- Double the recipe
- Use Bake instead of Convection in the oven
- Buy more poppy/sesame seeds, dried onion for toppings
- I might try ice water for dough mixing, but that will probably be the third try
- That’s it – no significant changes
- I can see how the initial rise could get out of control and end up being bread rolls
- Definitely buy a scale – I’m convinced it makes a difference in baking
Video References
I watched many, many videos on YouTube and read a lot of recipes, which I then made my own method. I did keep the hyrdation/salt ratio almost exactly the same.
- New York Bagels https://www.youtube.com/watch?v=hrJ1zpJGrfA
- Chef Steps – always great recipes. Didn’t like adding sugar, though. https://www.chefsteps.com/activities/soft-chewy-bagels-from-scratch?utm_source=youtube&utm_medium=post&utm_campaign=soft-chewy-bagels-from-scratch-P
- Pro Home Cooks – pretty good https://www.youtube.com/watch?v=qYq0D9tK2dk
Videos I sort of liked
- How To Make New York Style Bagels. From the looks of them they look like bread rolls. https://www.youtube.com/watch?v=W8j-ZUp7KD0&t=311s
- Binging with Babish – required adding extra gluten and I didn’t like how much syrup they added https://www.youtube.com/watch?v=ZrJtpCTZk38
- Good for hand kneading method – too much work for me https://www.youtube.com/watch?v=GTaF7pxwiv0
So that’s it. Let me know your comments/thoughts/successes/failures below!
Love this recipe! Definitely will make for Shabbat. I look forward to having this for breakfast. Thanks for sharing. Shalom