Disclaimer: Warning! These instructions include configuring high voltage wiring. There is a possibility of shock, death, and fire. You must know what you are doing and check your local codes if you are allowed to make these changes without hiring a professional electrician (not a handy man or your nephew). Proceed at your own risk.
Our 1980’s house is in the middle of nowhere, so gas is not an option. We have a number of 240V line voltage electric baseboard heaters, all controlled by the venerable and ancient technology of the Honeywell T498B1512 Thermostat dotted all over the house:
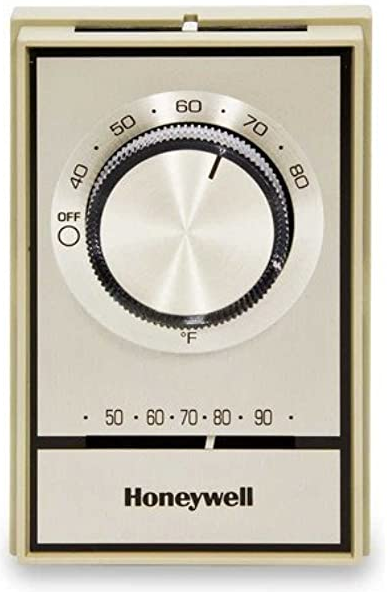
Look at those classic lines and color straight from what looks like the 1950’s (not sure of when they began making them). Does it work? Sure. Is it accurate? From my testing, somewhere in the +/- 7 degree range. One of its biggest drawbacks is how quickly it reacts – more than likely, the room will overheat before the thermostat shuts down power. Because of this lag, it is either too hot or too cold.
Of course, with a total of 9 of these (including an in wall electric heat fan), it is impossible to not only regulate the temperature, but also inconvenient to work at home in these Covid days. Your “office” is now an unused bedroom (if you’re lucky like me) and you turning it on in Winter to 72F/22C means waiting through the morning to get the room comfortable after turning it down at bed time.
Enter the modern WiFi enabled electric baseboard thermostat. There are several to choose from:
- HoneyWell RedLINK EConnect System
- Offers a whole house system
- Each radiator gets a wireless controller
- The set of wireless controllers are commanded by a single hub thermostat
- Seems like a great solution for new construction, but compatibility may have been an issue and what would I do with the outlet boxes where the old thermostats were? I would need to plate them (you cannot hide junction boxes behind drywall).
- Mysa Smart Thermostat for Electric Baseboard Heaters
- Relative newcomer to the scene
- Attractive
- Replaces all the old thermostats – no new wiring, etc.
- WiFi/App
- We went with this option and bought the Mysa at Amazon
- Update: great discounts if you bulk buy from Mysa directly.
- StelPro for baseboards and convectors
- Many, many options
- Seems like a better option that HoneyWell for a new home or a complete redo of the system
- They also manufacture many different baseboard, fan heaters, etc.
- Looks good, but too complex for our needs
- Needs a gateway (additional unit)
- King Electric Line Voltage Thermostats
- Some similar offerings to StelPro and Mysa
- Their HOOT product looked great, but is pricey (double that of Mysa)
- Sold at Home Depot, so that’s handy for returns, etc.
- Sinope Tech
- Lots of home automation options
- Cheaper than Mysa, but I preferred Mysa’s approach
- Better screen than Mysa – more information, but in our arrangement you can often see 2 units, so the Mysa is less intrusive
There are a couple of others, but I couldn’t remember them all and these are what Google gave me. Let me know in the comments if there are others.
Installation
Before we start, let’s talk electricity again. This stuff can kill you. You might be confident and have done this before, but don’t forget that the wiring might be old, might be chewed by mice, or might have been poorly installed.
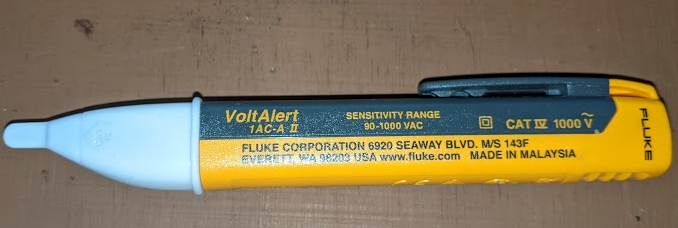
This goes wherever I go:
Fluke 1AC II VoltAlert Non-Contact Voltage Tester. Buy it from Amazon or somewhere else. I used to use this and a multi-meter until I figured that I can trust this to let me know if power is on. Get this or another brand, but keep it in your tool bag for when you’re playing with electricity (it’s very durable).
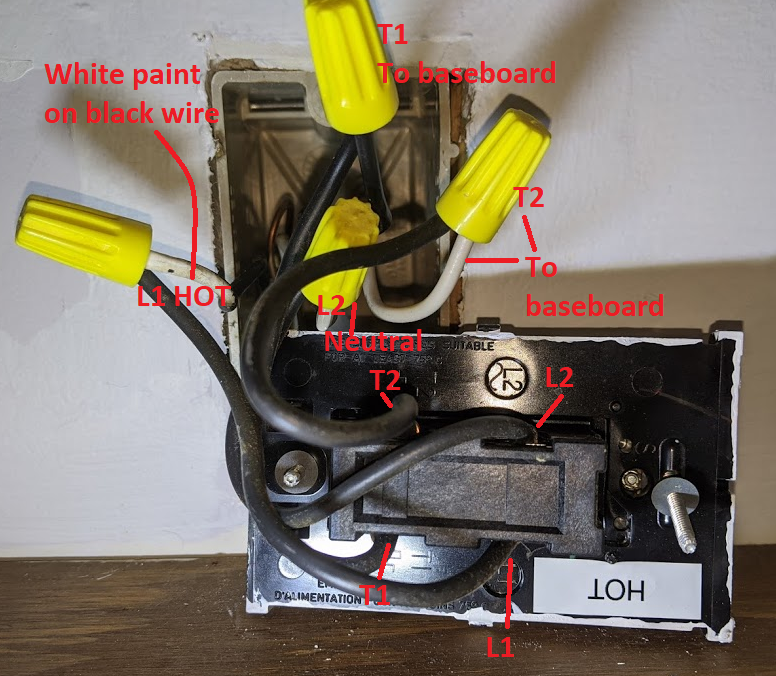
Anyway, I went through the Mysa Compatibility Checker to finalize our decision on buying. In my house, all of the thermostats are four wires with four connections to the old HoneyWell, both black and white. In my case, both wire bundles came from the bottom – often, the hot wire comes from the top and the load wire comes in from the bottom of the box for clarity.
Note: a couple of the installations had hot/neutral reversed (white was black, black was white). Keep an eye out for lousy installations.
Did you turn off the circuit breaker and test for power before doing this? Yes, you did.
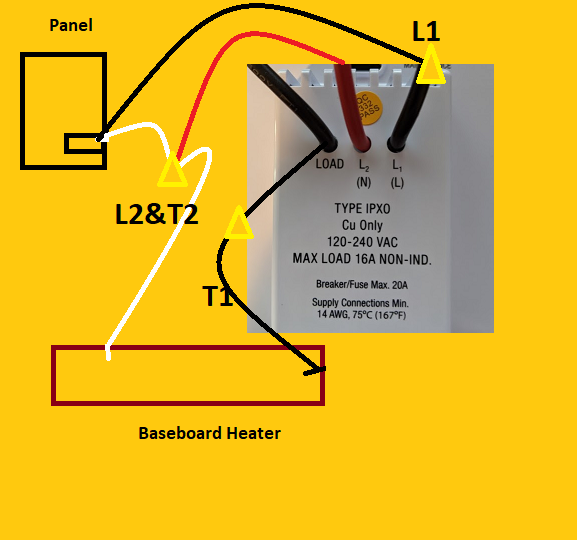
- L1, T1, etc., are printed on the thermostat itself – you can clearly see L2 molded into the plastic below
- L1 = Hot wire from electrical panel (black). There is some white paint on it in the picture – don’t be confused as it being the white neutral wire.
- L2 = Neutral wire from electrical panel (white)
- T1&T2 = Load wires to baseboard (white & black)
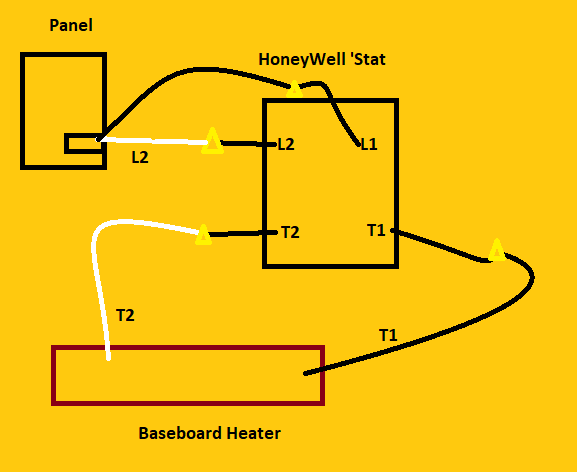
This is a diagram of the connections.
In Mysa’s guided installation instructions (available on their site, in the box, and via the app) they will show you this picture. See how it is different? L2 and T2 from above are wired together (many thermostats are wired this way). This will basically be how the Mysa is connected in the end, different from my four separate connections.

Here are the connections to the Mysa in it’s final form. Sorry about the bad image, but you get the idea.
- Hot black wire goes to L1 with a wire nut
- Neutral white, the white to the baseboard, and the red wire are connected with a wire nut
- Black load wire from the baseboard and the LOAD wire are connected with a wire nut.
After that, I turned on the breaker and it fired right up.
Network selection was simple and configuring the app/units is simple.
Cons
- It’s all about the display – it’s different in person – nice, but a little too simple
- The screen only shows the current temp
- It has a humidity sensor, but you can only see humidity in the app
- Would be nice to show both current and target at the same time
- A “heating” icon on the display would be great
- Overall, I would pay extra to have more information available instead of having to look at the app all time for details.
- It definitely ramps up the heat – I kind of miss the baseboard going from stone cold to blasting hot almost immediately.
- I did notice once that I raised the temp on the app and nothing happened for a couple minutes, then went to the unit and increased the temp – maybe you need to wait a while longer for the sync? Update: this behavior has stopped – it now syncs immediately or within a second or two.
Conclusion
So far, so good. For the price and our particular situation it works as is promised. It can do zones, is easy to install and configure, and looks a helluva lot better than the HoneyWell T498B1512. It should also dramatically increase our comfort and reduce costs, overall. It will take a little time realize those savings as with all of these convenience upgrades, but it should be worth it.
Updates
- 11-10-20 I set the schedule to go to 64F/17C from midnight to 8 AM and for it to be warmed up at 8. It worked perfectly – such a nice thing to come in ready to work and I’m not frozen. Also, unlike the old one, it seems to modulate the amount of energy. I’m still tweaking the temperature reported so that is why it is set so high (it’s located within a bookshelf without much airflow, so I assume it thinks it’s warmer than it actually is). But see the little flame icon with one part of it lit? That is showing the amount of power being sent instead of it being either on full blast, or off. Terrific! Very happy with this unit right now.

- 11-28-2020 Just installed 2 more after buying an additional 7. Original installation had hot/neutral wire colors reversed. Tested with multimeter and kept that configuration. Have not added zones, but waiting until all Mysa units are in and we’ve figured out what their local temperatures mean in terms of their proximity to the baseboard heaters, airflow, fireplace, etc. Still impressed.
- Feature Wish: With all of these sensors now in the house, it would be great to have the entire house act like a Nest and “learn” behaviors/temperature settings based on outside temps and user activities.
- 12-5-20 Completed installation with a total of 9 units. So far, based on our needs, I have two zones with two units each, then individual rooms. The zones/rooms use mostly schedules, but some are on demand since a couple rooms don’t need to stay warm (laundry room, for example). So far, so good! I’ve played around with the schedules a lot to take account for cool down/warm up and keeping the right ambient temperature so it doesn’t take a ton of energy to cover the deltas.
- Feature Wish: if not some AI to control things, showing outside temperature would be useful. This can just be based on Zip code and doesn’t need to be a real sensor.
- Feature Wish: The unit comes in two parts – the faceplate is removable for installation. Would be nice to have customizable face plates that offer more information instead of just Temp/s + up/down.
- Feature Wish: Do what Ambient Weather does and have all the temps, power usage, etc. recorded offsite and make the data downloadable so I can track usage based on outdoor temps, etc.
Just wondering, why didn’t you convert the same to Google self-learning Nest Thermostat? I have the same thermostat as well and am looking to convert it to Google nest smart thermostats.
These are 240 volt electric baseboards.
Nests do not support high voltage – they only support sending signals to a hydronic/AC/minisplit/etc. So, more like a remote control of a centralized system.
Each baseboard is usually an individual power circuit, so each one gets a thermostat on its own.