It’s been a long time since I have played with the Naze 32 and GPS. Not only have I been running Rev 5 (yeah, I am far behind the ball after the last couple of years), but I went to the dark side and got a 3D Robotics Iris+ and, recently, a DJI Phantom 4.
Now I’m getting back into mini-quads and since my previous post on getting GPS running with UART2 (not SoftSerial) was pretty popular I thought I would revise it here.
Here are a couple links to REV 5 and REV 6 Boards:
[AMAZONPRODUCT=B01BPTIA1U]
[AMAZONPRODUCT=B01MDOZK06]
CleanFlight has come a long way since I last posted here.I am running the latest configurator (1.2.3) and the latest version of CF: 1.13.0. Things are much easier and so this will be pretty easy, too.
Note: like with most GPS units, it will come assembled on a board with a ceramic antenna, the UBLOX chipset, and a battery. This battery allows the unit to get a “hot start” if the unit was disconnected. Over time, this battery drains, of course.
A few things you want to think about before proceeding:
- I had to wait about 5 minutes before the unit warmed up and charged the battery. It was only after this point that the unit started working reliably.
- I used to use a battery to temporarily power the Naze32 in conjunction with the USB power. You will need both USB and the external power to run the GPS unit. It is power hungry
- With the ubiquity of mobile phone chargers on hand, I selected one with a 1 or 2 AMP output (less amperage could mean unreliable power). I then took a spare connector wire and cut off the end right by the micro-usb connector. Inside are four wires. Two of them are black and red, and the other two (in this case) were green and yellow for signal. We need only the black and red for power. Cut the other two, but make one slightly longer than the other so there is zero chance they will touch.
Important! Check the polarity of the black and red wires. I just created a new power wire and black was positive and red was negative! You must check the polarity with a multimeter or you could fry your board (or anything else you connect to it) - Cut an old servo wire (you just need 2 wires, so remove the third) and then solder on the servo connector, being careful of the polarity, of course. You know how a reliable source of external power!
Getting Started. It is SO easy:
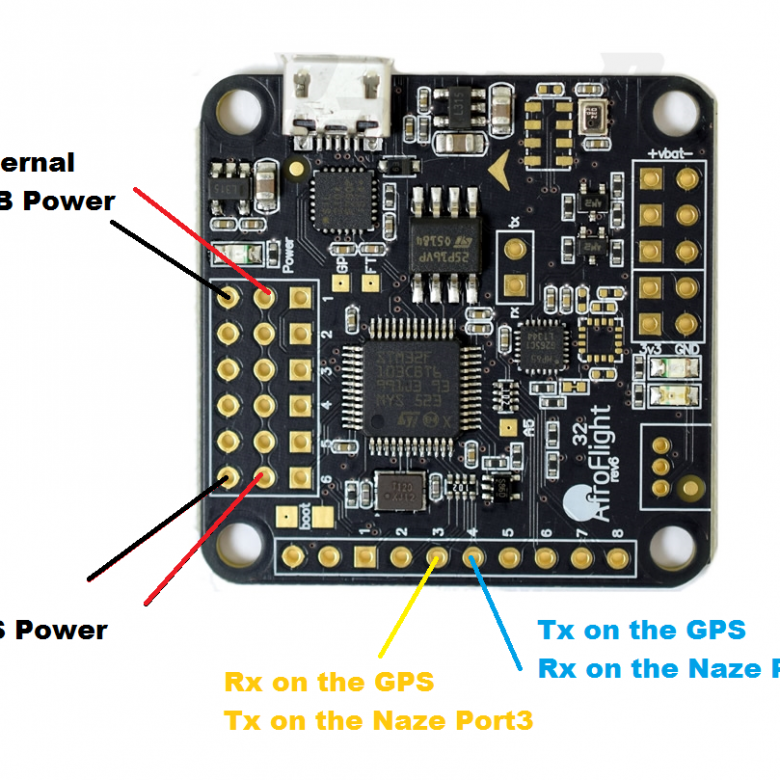
- Take a look at the following image. You will need to have:
- Your Naze 32 Rev6 wire connectors soldered in (unless you are going to solder directly to the board)
- Your PC turned on with a USB cable (data and power)
- Your GPS unit ready to be plugged in and make sure you can receive a GPS signal. Your phone is much more sensitive than some of these units, so if you can be by a window that is better than nothing. An open window is even better. If there are power lines right outside your window you might run into interference, etc.

- We are going to use UART2. Again, this is not the SoftSerial configuration. I will do that later on. All you need to is to add power to the board, plug the power wires for the GPS unit in, then connect the Tx of the GPS to the Rx on on the Naze, and the Rx of the GPS to the Tx of the Naze. When I first did this a long time ago I connected Tx to Tx and Rx to Rx thinking this was correct. It is not. It is In to Out and Out to In, if that makes sense.
- Now that is connected, plug in the USB connector and the USB power connection and open CleanFlight. Go to Ports.
Set the GPS to on and leave it at 57600 Baud. Click Save & Reboot.

Once you have reconnected, click Configuration.
Scroll down until you see GPS and turn it on.
Then select UBLOX, and your Ground Assistance Type (I selected North America)
You can get your magnetic declination by clicking here.
Click Save & Reboot

Reconnect and click on GPS.
As I mentioned previously, you may need to wait a few minutes for your unit to warm up.
If it has been a few minutes, try swapping your Tx and Rx cables.
If that doesn’t work, check all your connections and try again.
There is a chance that you might need to configure your GPS unit (and the best way to test it, anyway). UBLOX has free software called U-CENTER. I highly recommend you play around with and make sure you unit is configured.
So, that’s it, really. Pretty painless compared to the old days.
In a couple weeks I will configure the Naze with PPM and GPS, then try to get it running with SBUS and GPS, as well.
As usual, any questions? Add them below!
Hi, just read your excellent article on using the Naze32 rev6 with ublox GPS.
I have a question: with a pwm receiver, ports 3 & 4 on the Naze are already assigned to PWM channels 3 & 4 (usually pitch and roll I think). Is it possible to reassign these to a different port, or is GPS use just not possible with the Naze32 Rev6 and a pwm receiver?
I believe your only option is to go to PPM (Naze is PPM friendly).